Wednesday, December 31, 2014

Our 2014 Charity Picks

Charitable Giving

We feel lucky every day. Our community has provided us with a great place to live and work. Our kids can grow and learn in safety and comfort. We're surrounded by opportunities personally and professionally.

For that, we are eternally grateful, and we like to give a little bit back to our community. We work hard to research the charities we choose to support and to make sure they're doing the greatest good with their contributions.

Here are the charities we selected for 2014

Episcopal Relief and Development

Episcopal Relief & Development works to save lives and transform communities worldwide. They rebuild after disasters and empower people to create lasting solutions that fight poverty, hunger, and disease. They working in 40 countries impacting the lives of nearly 3 million people around the world.

ERD has a high rating on Charity Navigator. While we typically seek a higher rating, it's very close to the highest it can be and we have close personal ties with the organization.

One thing we love about this program is you get to donate specific needs to the communities you're supporting. This is certainly the first time we've donated a cow and chickens. We also funded farming tools and community gardens, prenatal and postnatal maternity care, and 1 year of education for 5 girls.

Tiger Flight Foundation

A little closer to home, the Tiger Flight Foundation, base in Rome, Georgia inspires kids to be "Pilot in Command" of their own lives. All donations go toward the motivational and character development programs.

My relationship began with Tiger Flight as a volunteer pilot. I had a young man in my plane and as we taxied out, he said, "I've never been in a plane before." I asked him what was his favorite place to visit. He told me he'd never been out of Rome, GA. He was nervously excited as we started rolling down the runway.

We had barely left the ground when he could no longer contain his excitement and he looked at me almost teary-eyed and said, "I feel like I can see the whole world from here!" I thought, "from here kid, the whole world is in front of you . . . and I think you'll see it."

Friday, December 5, 2014

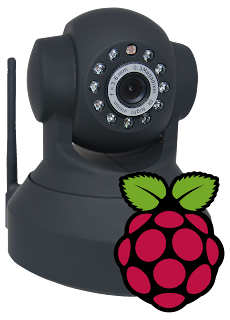
Secure Foscam IP Cameras with SSL on Raspberry PI and NGINX

Foscam + Raspberry Pi = SSL

When my first kid was born, my wife and I wanted a convenient, cheap, but externally accessible way to monitor our daughter. Thus, the usual baby monitors wouldn't do the trick. We ended up getting a really handy and super cheap Foscam FI8910W IP Camera.

Everything about it is pretty great … except security. For that reason, I never poked a hole through my firewall so that friends and family could peek in on Piper from time to time. I could always access the camera over VPN, but nobody else could ('cause I'm stingy with my network access).

When I found out I had another one on the way, I decided that not only did I need another camera, but I needed a more convenient way to securely access my cameras from outside my house. I decided I to pick up a Raspberry Pi and expose an https endpoint that could reverse proxy requests to my ip camera. This way, I have a secure connection into my house. It's still plain text between the camera and the pi, but that's inside my network and I'm less concerned about it there.

In any case, I picked up a Raspberry Pi Starter Kit which I recommend for your first pi. It'll come with the components you'll need to get set up. The second time I did this (for the sake of recording the steps to write this blog, I just formatted my own noobs card and I used the wifi dongle from the previous pi kit.

I tried to install noobs lite on an 8gb microsd card I got from the Raspberry Pi Downloads page, but noobs lite didn't work with the wifi dongle so I recommend plain old noobs. For the second time around, I just downloaded Raspbian and used dd to image the microsd. Again, I recommend noobs (and I recommend the starter kit) unless you feel pretty comfortable with command line utilities. If you are, use the instructions for installing operating system images from the raspberry pi site.

Pi

That being said, with noobs, you just format your micro SD card with FAT and copy the contents of the noobs zip to the sd card root. Put the SD card in the pi, connect the mouse and keyboard, connect ethernet or the wifi dongle, connect some video output, etc. Then, plug in the device.

The first thing to do is get connected to wifi. It's easier to do in the GUI so run startx, configure your wifi network, and log out.

Enable SSH in sudo raspi-config.

Using SSH to administer a box is kind of a pain without tmux so get that. Also, vim is awesome so get that too. Finally, we're going to be using nginx as our reverse proxy so install that as well.

sudo apt-get update && sudo apt-get install tmux vim nginx
To make SSH even easier, scp your public key to your pi's ~/.ssh folder and cat it into authorized_keys.

If you are using wifi, you'll find that wifi is disable after rebooting until the dongle is removed and re-inserted. You can change this behavior by executing

sudo vim /etc/network/interfaces
and changing
iface wlan0 inet manual
wpa-roam /etc/wpa_supplicant/wpa_supplicant.conf
to
auto wlan0
iface wlan0 inet dhcp
wpa-conf /etc/wpa_supplicant/wpa_supplicant.conf

You'll want nginx to start automatically on reboot too probably so execute

sudo update-rc.d nginx defaults

Router

Give your pi a static ip address. My router lets me map static ips to mac addresses. DD-WRT lets you do that too. If you can't with your router, configure a static ip address following the Debian Network Configuration Instructions.

Give your router a static ip as well.

Forward port 443 (the default SSL port) to 443 on the pi's IP address

Get a dynamic DNS account that's supported by your router. If your router doesn't do dynamic DNS (and you can't install a decent firmware that does, you can use ddclient on your pi instead.

Domain

You'll need a domain name that you own to get an SSL certificate. Register one.

In your domain's DNS configuration, create a subdomain with a CNAME record pointing to your dynamic DNS domain.

SSL

Get your SSL certificate from Start SSL (the free certificate will be fine). You'll have to validate your domain. The process is pretty straightforward.

Download your certificate, key, and the intermediate certificates and make a unified certificate:

wget http://www.startssl.com/certs/ca.pem
wget http://www.startssl.com/certs/sub.class1.server.ca.pem
cat ssl.crt sub.class1.server.ca.pem ca.pem > ssl-unified.crt

SCP the key and the unified certificate to the pi's /etc/nginx folder (I like putting my certs in a subfolder)

Configure nginx

Create a configuration file called /etc/nginx/sites-available/ipcams

server {
  listen 80;

  server_name your.domain.com;
  server_name your.pi.ip.address;

  return 301 https://$host$request_uri;
}

server {
  listen 443 ssl;

  ssl_certificate /etc/nginx/certs/ssl-unified.crt;
  ssl_certificate_key /etc/nginx/certs/ssl.key;

  server_name your.domain.com;
  server_name your.pi.ip.address;

  location /front_porch/ {
    proxy_pass http://your.porch_cam.ip.address:80/;
  }

  location /baby_room/ {
    proxy_pass http://your.baby_cam.ip.address:80/;
  }
}

Remove the default symlink from /etc/nginx/sites-enabled and add new symlink

cd /etc/nginx/sites-enabled
sudo ln -s ../sites-available/ipcams ./ipcams

Restart nginx:

sudo service nginx restart

Summary

So, now https requests to your subdomain are resolved by your dynamic DNS to point to your IP where your Pi is. Your Pi gets an https request and forwards it inside your well protected network (in plain text) to your camera. I keep my Pi wired to cut back on the wireless traffic that happens in plain text. In any case, this way you can get from outside your house to inside your house over an encrypted ssl connection.

Friday, November 14, 2014

Refresh/Update jQuery Selector after Ajax or other DOM Manipulation

jQuery Logo

I'm working on a more or less single page app right now. As such, there's a lot of dynamic DOM manipulation. Sometimes, we need to re-evaluate a jQuery selector to get the new set of objects after the DOM has changed.

Typically we've solved this problem by always using the selector to find the children. This became really frustrating in my Jasmine tests where I found myself doing this a lot!

    it("toggles the display of an element", function() {
        var $togglableItem = $('.togglable');
        expect($togglableItem.length).toBe(0);
        
        $button.trigger('click');  
        var $togglableItem = $('.togglable');
        expect($togglableItem.length).not.toBe(0);
        
        $button.trigger('click');  
        var $togglableItem = $('.togglable');
        expect($togglableItem.length).toBe(0);
    });

Even in production code (outside of tests) that can be kind of a pain. I wanted to be able to do something more like this:

    it("toggles the display of an element", function() {
        var $togglableItem = $('.togglable');
        expect($togglableItem.length).toBe(0);
        
        $button.trigger('click');  
        expect($togglableItem.refresh().length).not.toBe(0);
        
        $button.trigger('click');  
        expect($togglableItem.refresh().length).toBe(0);
    });

A Common Solution

I've seen some implementations of a jQuery refresh plugin that look like this:

(function($) {
    $.fn.extend({
        refresh: function() { return $(this.selector); }
    });
})(jQuery);

I have two problems with this approach. First, I don't always have my elements attached to the DOM when I want to do a refresh. In fact, typically in testing, I don't add my test elements to the DOM so I can't just reuse the selector. The selection depends on the parent jQuery object.

Second, I also really enjoy the fluency of jQuery and often make use of .end() method when it makes sense. The approach above flattens the selector stack and .end() returns the default jQuery object.

Preferred Approach

To maintain the fluency of jQuery and allow the refresh, here's what I'm proposing:

(function($) {
    $.fn.extend({
        refresh: function() { 
            var $parent = this.end();
            var selector = this.selector.substring($parent.selector.length).trim();
            return $parent.find(selector); 
        }
    });
})(jQuery);

Caveats

I haven't used this in the wild yet. I know .selector is deprecated, but it's the best I could find for now. It does, however, work pretty darned well in my Jasmine tests. :)

Monday, May 12, 2014

How to Market a Mobile App: Professional Design

The New This to That

The next phase in the How to Market a Mobile App series was to try a whole new look and feel. While I feel like the design of This to That was actually pretty good, it's obvious design is not really my strong suit. I hired a professional design company that reworked my icon for about $150.

I dropped the new icon into the game and had my wife play with the This to That theme generator for a while. She came up with what is now the current This to That default theme. We are pretty pleased with the way it turned out and it appears users are too.

Promotional Images

Another thing we changed were the promotional images that show up with the app on the app store. I had reviewed dozens of my favorite apps to see which ones I thought had the most compelling promo images. I noticed I was most enticed by promotional images that featured interesting design with the application screenshot embedded in the image (rather than the whole image itself).

I had tried my hand at this kind of design and these are what I had before:

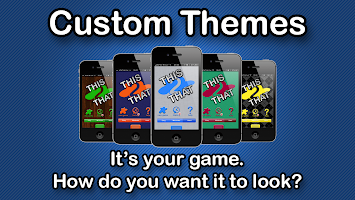
Game Center Integration Intuitive Play Social Features Custom Themes

In an effort to try something new (and to get a new release out faster), I decided to replace these with simple screenshots. You can see them on the This to That on iTunes page. I may have my designers throw together some new promotional images if I start to get enough data about new downloads that I'll be able to share any significant observations about their effectiveness.

Results

Before/After Pro Design

The new graphics don't appear to have had a huge impact on new users. It looks like about 10% - 20% more downloads than before. None of the current users have complained in comments or ratings so that's probably a good sign really. I think the most interesting statistic I've observed this time around is in session duration.

It appears whatever I added between 3.5 and 4.1 was displeasing to users. We went from an average of 4 minutes per session to about 2 minutes per session. 4.2 brought us back up and 5.0 and 5.1 have leveled us off at about 3 minutes per session, but almost all of our players now play every day.

A few other observations

  • Very few people attempt to play multiplayer
  • Many players open the drawer; very few swipe it
  • Since we moved the help button, more people click help
  • There are very few social sharing events
  • Most common incorrect words: TOOS, BEAS, SEAP, BONS, BAIN

Next Steps

I have a release ready to go in hopes that we get more reviews on the app store (hopefully positive too). We have always had a feedback button in the app, but at some point the link broke so presently it takes you to the app store but not to the app's page. To fix this, we started using appirater. On a related note, I recommend using cocoapods for iOS app dependencies.

Saturday, April 19, 2014

How to Market a Mobile App: Professional Review Sites

Mobi Apps Review

I've been working on the revealing (and humbling) How to Market a Mobile App series so I've found myself more open to some ideas that I usually am. A few months ago, I got an email from the owner of Mobi Apps Review. I've heard about sites like this before that establish a viewership on their website and on social networks. Some friends tried it out paying as much as $5,000 for one review.

Mobi purported to have 25,000 followers on twitter and the same on facebook. The offer was to write a review and publish it on all of their social networks for $25. I figured, it's worth 25 bucks just to know what a little exposure could do for me. Besides, it'll give me something to post about on the Mobile Magic Developers facebook page.

The Mobi Apps Review of This to That came out March 6th, 2014. It was nice to see that the review was generally positive. Not all of the reviews on Mobi are positive so I feel like the reviewer really did enjoy the game.

Results

I reviewed the Google Analytics for the 3 weeks before and the 3 weeks after the Mobi review was posted. I saw no discernible effect on new users.

Conclusion

I don't think the lack of results necessarily indicates that the review had no impact. To be sure, I could've spent more effort promoting the review. I also, unfortunately, have no insight into how many viewers actually saw the review. Of those viewers, I have no idea how many visited the This to That for iOS app store page. Even if I did, I have no way of knowing how many people who view the app store page actually download the application and whether or not the review had an impact on that.

All in all, I think it was worth 25 dollars, and I expect to get value out of it at some point. Now, I can mention the 5 star review in the profile description which needs to be revamped anyhow. I can also reference it in posts on our facebook page. The gestalt effect of having an additional third-party link out there is likely to help support my efforts in marketing This to That.

How to Market a Mobile App: Design Counts

Default theme progression

As I discussed previously in the How to Market a Mobile App series, one of the first things I could do to improve user experience in This to That for iOS is not only to support the look and feel of iOS 7 but also to improve the color selections of the default theme. At the time I released the latest version of This to That, the iOS 6 SSL vulnerability hadn't been discovered yet, so I have a new default iOS 6.0 theme (that nobody will ever see again). :)

Results

There were no notable changes in new user acquisitions nor in returning user frequency. There may have been a slight reduction in session time and a slight increase in screen views per session. Reviews are still generally positive, but it appears changing the theme had very little impact on the performance of the application

Next Steps

I had a new icon designed professionally. I made the current icon and while I think it's pretty cool, it definitely doesn't look quite as engaging as the new one does. I need to re-release This to That with that icon in hopes that it increases new user acquisition.

Screenshots

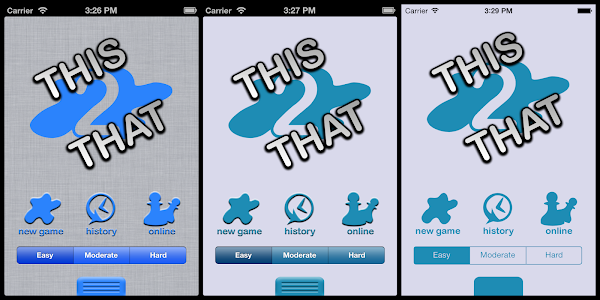
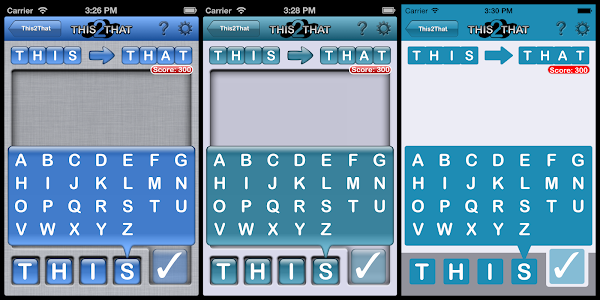
Each set of screenshots shows the original theme on the left, the new default iOS 6 theme in the middle, and the new flat iOS 7 theme on the right. You can still select the "reflective" tile type in the theme builder to get the old look and feel, but the linen background is no longer available to iOS 7 users. Instead, it's just gray.

Basically, the theme is lighter, flatter, and sharper. The last few images demonstrate the difference in texts. Instead of inlaid icons for the letters, they're all just flat letters in a built in system font. Eventually, I think I'd like to switch the fonts throughout the application to use iOS 7's default font.

Default theme progression

Letter selector theme progression

Complete game theme progression

History theme progression

Game font changes

Letter selector font changes

Saturday, March 15, 2014

A Limerick Standup: AngularJS, PhantomJS, and Jasmine

Logs

In honor of St. Patty's Day, I decided a limerick standup would be appropriate:

I've made some good progress with Angular
Though nothing of mention particular
     I have some good tests
     That pass in PhantomJS
And if Jasmine were here, I would strangle 'er