Showing posts with label It Takes an Engineer. Show all posts

Monday, October 12, 2015

Size Matters: Improve Productivity with Cheap Screen Real Estate

Common Screen Sizes

It's hard to hire developers, and technical resources are expensive. Everyone is trying to figure out how to attract top talent, reduce turnover, and increase productivity of existing staff without reducing their work/life balance.

Early on, I decided that if you're going to spend 8 hours a day 5 days a week for almost 50 weeks a year doing something, everything about it should be as pleasant as it could be. I bought a new Macbook pro and two thunderbolt displays. Those investments very quickly paid off.

Until recently, the benefits of large technology investments were just intuition. Last week, I realized how much more productive I was working remotely than when I'm onsite with the client. One reason is that when I'm remote I get a lot more flow, but another reason is that when I'm remote, I have a lot more screen real estate so I can see a lot more information at once.

I decided it was time to be more productive onsite too. This time, I wanted to have more concrete justification.

Screen Selection

A friend of mine and I did a fair amount of research picking out monitors that gave us the best bang for our bucks. I'm really happy with my Thunderbolt Displays. They're IPS and they're quite high PPI. This time, I wanted to try something a little cheaper and a little larger and I wanted to try a VA panel so I ended up getting a BenQ BL3200PT. This monitor, I think, has the same panel as the Samsung S32D850T, which has a slightly smaller price tag.

Screen Real Estate

When I talk about screen real estate, I'm not talking about the diagonal size of the screen; I'm talking about the resolution of the screen. Having a larger screen doesn't do anything for you (at least not in the sense of a computer monitor) with regard to how much information you can fit on the screen at one time. The difference between an HD 1080 screen at 27" vs. 32" is just stretching. Resolution, however, is how many pixels the screen has. The more pixels there are, the more options the computer has to present data (provided you have the visual acuity to perceive the data without scaling).

These displays are 2560 x 1440 or WQHD and are the same resolution as my thunderbolt displays, albeit over a larger surface area. Thus the resolution is not quite as crisp as my thunderbolts, but still these are very high quality screens. If you're into lower pixel pitch and higher PPI, I don't blame you. Higher pixel density screens are much more pleasant to look at, but they do come at a cost.

Comparing Resolutions

There are two very common resolutions in offices these days. An older WSXVGA+ which is an 8:5 aspect display at 1680 x 1050 pixels. HD 1080 is also quiet popular which is the 16:9 display at 1920 x 1080. The HD 1080 has about 17.6% more pixels than the WSXVGA+. By comparison, the WQHD, also 16:9, has 2560 x 1440 pixels (sometimes called 1440P). It has about 77.8% more pixels than HD 1080 and about 110% more pixels than WSXGA+. That is to say that if you have 1 WQHD display, you have more pixels than a dual screen WSXGA+ setup.

Benefits of Screen Real Estate

The benefits of additional screen real estate, unfortunately, are easier to experience than they are to describe. Having additional real estate may mean that you will sense more data at the same time, but does not necessarily mean you will perceive these data. Similarly, having the ability see multiple windows does not mean that you won't just continue editing one file at a time in a full screen editor. On the other hand, not having the ability to optimize your workflow guarantees that you will not.

Anecdotes

I do have a few anecdotes that buttress my belief that having more screen real estate is inherently valuable. One time when I'm particularly keen to the benefits of higher resolutions is when I'm developing responsive designs. I'll often dock my browser's DOM inspector on the side and I'll slide the split pane to different responsive breakpoints watching the HTML/CSS changes flash in the inspector. The additional real estate means I can see meaningful data in the DOM inspector and the responsive design at the desktop breakpoint at the same time.

Another time I notice the benefits of having additional screen real estate is when working on native mobile applications. Native development often involves simulators and emulators. Scaling during emulation isn't always well supported. Thus, the additional pixels allows you to see the entire simulator at once.

Another example that I found particularly fascinating happened shortly after I took over a new project. I had been working on the project for a few weeks from the client site. One day, I was working remotely and I had my terminal window off to the left and I had the application in a browser to the right. This is a usual screen configuration for my workflow on my cinema displays. I had changed some code and the application reloaded. When it did, I noticed dozens of queries pop up in the log. None of the ORM queries had been optimized to prevent N + 1 queries. I spent a few hours fixing those, but may never have noticed them had I not had enough room on my screen to comfortably view the browser and the terminal at the same time.

Summary of Benefits

Typically on HD 1080 and especially on WSXGA+, I have only one window visible at a time. That's why I didn't notice the N + 1 queries until I was remote. There may be myriad other benefits of the additional screen real estate when considering looking at code in multiple panes, test driven development, debugging, guard and live reload, etc.

Costs

High quality screens can be expensive! The thunderbolt displays are almost $1,000 each. The BenQ was $550. The Samsung is $500. It's hard to imagine pulling out all of your existing displays and replacing them with displays that cost several hundred dollars. Heck, I spent hours justifying buying only one.

That's why it clicked. At some point I realized, it doesn't take much before the investment in display technology pays off. According to several job posting / salary research sites, the average developer in Atlanta makes about $120K per year. To keep the math easy, I'll call it $100K (also because I like lowballing estimates like this). Normally, overhead on a W-2 employee is roughly 25% - 50% of annual salary. If you have a very modest benefits package (and not a lot of PTO), then an average developer in Atlanta will cost about $125K per year.

Even if your organization buys these screens the same way I did (i.e., no sales tax and no bulk discount), then it'll cost about $550, or about 0.4% of the cost of an average developer. That means that if you bought 100 of them, it would cost less than half of the annual salary of your average developer for a year. Thus, if you have 100 developers and you get 100 screens and each developer is 0.5% more productive for the year, then you actually make money on the investment.

If the cost still seems too high, you don't have to get VA panels. In fact, 32 inch screens are pretty big (they take up a lot of desk real estate too). These 25" Dell U2515H IPS panels were only $350 at the time of writing. 100 of these would be less than 1/3 of the underestimated developer annual cost.

Recuperating Costs

The average American works 1,780 hours per year. To recuperate 0.28% of a developer's cost, the developer only needs to produce about 5 hours more per year. That could be working an additional 5 hours per year because work is more fun. It could be 5 hours saved by not having to tab between windows and the cost of brief context switches. It could be 5 hours not spent tracking down performance issues in production because some N + 1 queries sneaked through.

It could be 5 fewer hours spent recruiting great job candidates because the technology makes the company a better place to work. Developers with neat technology are more inclined to passively as well as actively recruit for you. This can bolster your recruiting efforts, also saving money. Similarly, developers with a satisfying work environment are less likely to leave their jobs reducing the high cost of turnover.

Studies on worker productivity show that American workers tend to have about 6 (and some studies show as few as 3) productive hours in an 8 hour workday. Better screens may improve ideal hours per day. That means if all of your developers show up Monday morning and find their brand new screens, and in their excitement they're productive for 8 hours on Monday and Tuesday (rather than 6) and 7 hours on Wednesday, then in the first 3 days, the screens have paid for themselves. I could be completely wrong about everything else and your net could still be more valuable somewhat liquid (they have good resale values) assets for free.

Remember, you only need 5 additional productive hours per year to cover the cost of 1 high resolution display … and that's if you buy new screens every year. If you plan on keeping the displays for 5 years, it's just 1 hour per year.

Incredulous?

Let's consider a more pessimistic case. Let's say your staff, on average is pretty junior (and you're using technologies that aren't particularly backend heavy. If that's the case, your developers may cost you an average of $80K salary and per year and $20K in benefits, taxes, recruiting efforts, etc. Let's say they also take no vacation or sick leave and thus work a full 2,080 hours per year. Further, your staff is productive 100% of working hours.

In this case, you're paying an average of $48 per productive work hour. If you buy very nice displays at say, $960 each, then you need 20 additional productive hours to cover the cost of one display. Even in this very unlikely case, that's less than 1% per developer. And they don't need to work 2,100 hours in a year per se. They can be 1% more efficient. That means if they're writing 100 lines of perfect code per day, then to cover the cost of a new display, they only need to write 100 lines of perfect code per day (and on the tenth day, perhaps they write 10 extra perfect line of code . . . or better yet, they delete a line or two).

More likely your average developer is closer to $125K per year, they work 1,780 hours per year, and they are productive fewer than 6 of every 8 hours. Thus, their cost is $94 per productive hour. Also, it's very reasonable to get smaller IPS WQHD panels for $350 each (especially if you have a large team and get a bulk or corporate discount). So, you need fewer than 4 hours per developer or 0.3% more productivity. An average developer contributes 10 lines per day to the codebase (Mythical Man Month) so to break even on your investment, your average developer only needs to net an additional 3 lines of code every quarter.

n.b., I don't support using lines of code as a measure of productivity. It's merely illustrative of the relative scale of the cost of a display to the cost of a developer. Try your own calculations using bugs sent to production, mean time to defect resolution, etc.

Recommendation

I recommend making an investment to replace low resolution displays for developers and pairing stations (and I would consider broadening the reach really to non-technical employees as well) with high resolution displays. I think that the cost of the hardware would be recovered very quickly by improved developer efficiency and performance. The investment is low risk because the cost is relatively low and the displays are a moderately liquid asset.

If you have 100 developers on your team, it may be hard to get approval for the capital to buy $35,000 worth of displays. In that case, you can always hire another developer (well, you can try at least) for $35,000 per quarter.

Display Options

Dell P2416D 24 Monitor with QHD 23.8-Inch Screen, Black
Dell UltraSharp U2515H 25-Inch Screen LED-Lit Monitor
Dell UltraSharp U2715H 27-Inch Screen LED-Lit Monitor
BenQ BL3200PT 32-inch WQHD 10-bit USBx4 HDMI Monitor built for Creative Class
Samsung 32" WQHD LED Monitor (S32D850T)

Wednesday, June 10, 2015

Project Nostalgia: Warehouse Management

All Work and No Play

Early in my development career, I got a job at an entertainment company that rented party supplies like inflatable bounce houses, inflatable slides, human gyroscopes, etc. On my first day, I was introduced to my new boss, the owner of the company, on his way out the door headed to China for 2 weeks.

I introduced myself, thanked him for the opportunity, and asked what he wanted me to work on while he was gone. "You'll figure it out," he said, "make us some money." And out the door he headed.

Once I found my office and tracked down a computer, I sat down and thought, "what the heck am I going to do here?" Having just gotten my MBA, I decided I'd take a page from my business consulting class and just "see what my lantern shows me." I walked around asking my new coworkers what the company does, what they do, and what could make their lives easier.

There were the usual gripes, manual processes, duplicate paperwork, etc. One problem in particular, however, I found particularly intriguing. It turns out that the company had an uncomfortably high refund rate because they'd show up at parties and equipment would be missing. They also would only schedule a few parties a day, despite having plenty of equipment to spare, because it took so long to prepare for an event. Similarly, they required reservations be made a week in advance.

Shopping in Your Own Warehouse

If you're like me, when you make a grocery list, you write items down in the order you think of them. Then, when you go to the store, you walk up and down the items, grabbing things from the list and crossing them off as you go. Also, if you're like me, sometimes you pass an item and you have to go back. Or, you don't notice an item that you missed and you go home without it.

If you want to try an experiment (actual or thought), commit to going to the grocery store and getting everything on your list in the order it appears on your list. You'll probably find you forget less stuff, but you do a lot more walking around the store. It's not a particularly efficient way to organize a shopping trip. If you implement this in, say, a warehouse you may issue fewer refunds but you can't increase the number of events you can service in a day.

I'm sure by now, you're imagining myriad ways to organize a list of grocery items so that, if nothing else, at least you have some consistency. You could organize them alphabetically. That way, your items on your list will follow more or less the same pattern visit to visit. That may or may not be better than in the order you thought of them (assuming you remember grocery needs that are grouped together).

Imagine, however, that you can't sort your grocery list in the order you think of it. Imagine you can't even sort the list alphabetically. In fact, your only option is to sort the items on the list in the order the item first appeared in your grocer's inventory. Imagine how nonsensical it would be trying to track down where all of your groceries were. How much you'd forget (or perhaps even leave deliberately). That's what we had.

A Guided Tour

I printed our inventory list and I walked around the warehouse writing down the exact coordinates of every product and every component we had. I also estimated the volume, weight, and stack-ability (if you will) of the item.

Hoping to get a cheap win and to prove that it could make a difference (some of the guys in the warehouse weren't interested in their inventory lists being optimized), I got a few of the guys to agree to try it out for 1 day. I entered my data into the inventory table and sorted the inventory list by aisle, bin, then level. That was it. Only took a few minutes, was easy to revert if it failed, and I could switch it based on the user.

When I got back from lunch, one of my coworkers who sat outside my office said, "hey, warehouse really wants to talk to you … they've been in and out of here constantly since you left." I thought, "oh no . . . I probably broke something and they can't print inventory lists at all now."

I headed out to the warehouse preparing my apology. I had barely walked through the door when someone said, "hey Patrick, check this out?" There were several palates stacked with boxes and party equipment distributed along the loading dock. "What's up?" I asked.

Turns out my first sorted list was such a hit that they decided to start racing each other to see who could fulfill the inventory list faster. They had not only prepared the next days events, but several days after. I know it doesn't sound like it should take that long, but this warehouse typically had 4 or 5 people preparing 10 or 15 parties a day give or take.

A Deliberate Solution

Feeling I'd created some real value, I went back to my sorting. I updated the logic so that bins were in reverse order on odd number aisles (they started at the end of aisle 1, went to 2, the back up 3, and so forth). I sorted the items so that, given close proximity, the larger or heavier items would appear in the list first so they'd be on the bottom of the cart.

In the display, I grouped the items by aisle. Once I did this, I realized I should start at the end of the first aisle that had equipment on the list, then continue on the beginning of the next aisle with equipment (rather than just naively going up and down each aisle). With the help of the warehouse team and some statistics I pulled from the historical invoice data, we also started physically grouping items based on how frequently they were pulled on the same list.

Some of them were obvious. If you ordered an inflatable, you'd likely also get a blower. People who rent tents also rent chairs. Some were less obvious. People who rented dance floors typically didn't rent inflatables but did rent a bar and concessions. Once we established that not only could we control our own inventory but that we can control our own reports, it became a game to optimize the process.

In the end, it only really took 1 person to run the entire warehouse, though we staffed 2 because people liked working together. The rest of the warehouse team got promoted. It was actually something of a coveted job to get to deliver the equipment, spend some time outside, visit with the people having the party (partying people are usually pretty happy people).

We also started booking more parties. We even booked parties same day if we had the equipment and the people available. I'm sure there are COTS products that are really good at solving this very problem, but solving a real business problem with feedback from the people who were most impacted by it and seeing measurable gains in revenue was well worth the effort. It also help build some relationships and establish a collaboration they'd never had before (I was the first developer who worked onsite).

Friday, December 5, 2014

Secure Foscam IP Cameras with SSL on Raspberry PI and NGINX

Foscam + Raspberry Pi = SSL

When my first kid was born, my wife and I wanted a convenient, cheap, but externally accessible way to monitor our daughter. Thus, the usual baby monitors wouldn't do the trick. We ended up getting a really handy and super cheap Foscam FI8910W IP Camera.

Everything about it is pretty great … except security. For that reason, I never poked a hole through my firewall so that friends and family could peek in on Piper from time to time. I could always access the camera over VPN, but nobody else could ('cause I'm stingy with my network access).

When I found out I had another one on the way, I decided that not only did I need another camera, but I needed a more convenient way to securely access my cameras from outside my house. I decided I to pick up a Raspberry Pi and expose an https endpoint that could reverse proxy requests to my ip camera. This way, I have a secure connection into my house. It's still plain text between the camera and the pi, but that's inside my network and I'm less concerned about it there.

In any case, I picked up a Raspberry Pi Starter Kit which I recommend for your first pi. It'll come with the components you'll need to get set up. The second time I did this (for the sake of recording the steps to write this blog, I just formatted my own noobs card and I used the wifi dongle from the previous pi kit.

I tried to install noobs lite on an 8gb microsd card I got from the Raspberry Pi Downloads page, but noobs lite didn't work with the wifi dongle so I recommend plain old noobs. For the second time around, I just downloaded Raspbian and used dd to image the microsd. Again, I recommend noobs (and I recommend the starter kit) unless you feel pretty comfortable with command line utilities. If you are, use the instructions for installing operating system images from the raspberry pi site.

Pi

That being said, with noobs, you just format your micro SD card with FAT and copy the contents of the noobs zip to the sd card root. Put the SD card in the pi, connect the mouse and keyboard, connect ethernet or the wifi dongle, connect some video output, etc. Then, plug in the device.

The first thing to do is get connected to wifi. It's easier to do in the GUI so run startx, configure your wifi network, and log out.

Enable SSH in sudo raspi-config.

Using SSH to administer a box is kind of a pain without tmux so get that. Also, vim is awesome so get that too. Finally, we're going to be using nginx as our reverse proxy so install that as well.

sudo apt-get update && sudo apt-get install tmux vim nginx
To make SSH even easier, scp your public key to your pi's ~/.ssh folder and cat it into authorized_keys.

If you are using wifi, you'll find that wifi is disable after rebooting until the dongle is removed and re-inserted. You can change this behavior by executing

sudo vim /etc/network/interfaces
and changing
iface wlan0 inet manual
wpa-roam /etc/wpa_supplicant/wpa_supplicant.conf
to
auto wlan0
iface wlan0 inet dhcp
wpa-conf /etc/wpa_supplicant/wpa_supplicant.conf

You'll want nginx to start automatically on reboot too probably so execute

sudo update-rc.d nginx defaults

Router

Give your pi a static ip address. My router lets me map static ips to mac addresses. DD-WRT lets you do that too. If you can't with your router, configure a static ip address following the Debian Network Configuration Instructions.

Give your router a static ip as well.

Forward port 443 (the default SSL port) to 443 on the pi's IP address

Get a dynamic DNS account that's supported by your router. If your router doesn't do dynamic DNS (and you can't install a decent firmware that does, you can use ddclient on your pi instead.

Domain

You'll need a domain name that you own to get an SSL certificate. Register one.

In your domain's DNS configuration, create a subdomain with a CNAME record pointing to your dynamic DNS domain.

SSL

Get your SSL certificate from Start SSL (the free certificate will be fine). You'll have to validate your domain. The process is pretty straightforward.

Download your certificate, key, and the intermediate certificates and make a unified certificate:

wget http://www.startssl.com/certs/ca.pem
wget http://www.startssl.com/certs/sub.class1.server.ca.pem
cat ssl.crt sub.class1.server.ca.pem ca.pem > ssl-unified.crt

SCP the key and the unified certificate to the pi's /etc/nginx folder (I like putting my certs in a subfolder)

Configure nginx

Create a configuration file called /etc/nginx/sites-available/ipcams

server {
  listen 80;

  server_name your.domain.com;
  server_name your.pi.ip.address;

  return 301 https://$host$request_uri;
}

server {
  listen 443 ssl;

  ssl_certificate /etc/nginx/certs/ssl-unified.crt;
  ssl_certificate_key /etc/nginx/certs/ssl.key;

  server_name your.domain.com;
  server_name your.pi.ip.address;

  location /front_porch/ {
    proxy_pass http://your.porch_cam.ip.address:80/;
  }

  location /baby_room/ {
    proxy_pass http://your.baby_cam.ip.address:80/;
  }
}

Remove the default symlink from /etc/nginx/sites-enabled and add new symlink

cd /etc/nginx/sites-enabled
sudo ln -s ../sites-available/ipcams ./ipcams

Restart nginx:

sudo service nginx restart

Summary

So, now https requests to your subdomain are resolved by your dynamic DNS to point to your IP where your Pi is. Your Pi gets an https request and forwards it inside your well protected network (in plain text) to your camera. I keep my Pi wired to cut back on the wireless traffic that happens in plain text. In any case, this way you can get from outside your house to inside your house over an encrypted ssl connection.

Tuesday, November 3, 2009

Designing a Shampoo Bottle Takes an Engineer

Garnier FructisI was taking a shower this morning when I realized that it takes an engineer to design a shampoo bottle. My fiancee buys this Garnier Fructis stuff. I don't know if it's any good because I'm not smart enough to tell the difference between two shampoos, but she is so I assume it's not bad. In any event, it may have the dumbest design I've ever seen on a product container.

Take a look at the picture of the bottle. You see that little dark greed ball at the top? That's the mechanism for opening the bottle. Now, I obviously don't know in what order you execute your shower routine, but I'd hazard to guess that by the time you get to opening your shampoo bottle, your hands are already wet.

Now, let's say, just hypothetically, that over time a thin layer of soap or shampoo builds up on that stupid little ball. Now, your hands are wet and the bottle is damp and covered in soap and you have to try to pop the top of that bottle by what means? Grabbing? Prying? Squeezing? Try as you may, you can't get a grip on a semi-spherical wet soapy cap.

But, consider what happens over time. When you squeeze the shampoo out of the bottle and then close the cap, you've undoubtedly confined a small amount of shampoo between the cap and the shampoo dispensing opening. This shampoo dries while you're at work somehow morphing into the exact chemical composition of super glue! The next morning, you have to try to un-super glue your shampoo cap by using your wet fingers to apply friction to a soapy sphere.

WTF Garnier? Just, WTF?

Sunday, August 30, 2009

Understanding Tax Brackets Takes an Engineer

Tax Bracket GraphI've talked to dozens of people who have a dramatic misunderstanding of tax brackets (or tax rate schedules). In fact, I think I've run into more people who misunderstand how taxes work than who understand. So, I thought I'd demystify one small part of the American income tax system — brackets.

Many people believe that shifting from one tax bracket to another yields a major leap in income tax. This is incorrect. When you move from the 15% tax bracket to the 25% bracket for example, you're not suddenly paying an additional 10% in taxes. That is to say that if you make $33,950.00 per year (the highest salary for the 15% bracket) and you get a 1 cent raise bumping you up to the next tax bracket, that your change in income tax will actually be zero dollars.

Here's how that works. If you're in the 15% bracket, you pay 15% on income above $8,350.00 and you add $835 to that. The next bracket up is for people who earn more than $33,950.00 and less than $82,250.00. They pay 25% on income above $33,950.00 plus $4,675.00. Now, here's an interesting observation. If you take 15% of $33,950.00 - $8,350.00 (the maximum for the 15% bracket) and add $850, you get $4,675.00. That means that the maximum for the 15% bracket is the same as the minimum for the 25% bracket.

Thus, there's not a major leap between brackets. So, what are brackets for? Well, basically, the tax bracket just defines the rate of change between the minimum and the maximum incomes in the bracket. If you remember taking algebra back in the old days, you're just talking about slope. Basically, your tax bracket defines the slope of the line on which your tax is determined from your income.

Consider the slope-intercept form for a line: y = mx + b where b is the y intercept and m is the slope. If you look at the graph at the top of this blog (created with a free iPhone app called grafunc by Fabio Policarp), you'll see a blue and an orange line. The blue line represents the 15% bracket using the equation y = .15 (x - 8350) + 835 and the orange line represents the 25% bracket with the equation y = .25 (x - 33950) + 4675. Where those two lines intersect is where you switch brackets.

That's about all there is to understanding tax brackets. There's much more to understand about taxes, but that's another blog post altogether.

Monday, July 6, 2009

Sign Placement Takes an Engineer

Traffic SignI was driving into work this morning and I noticed a sign off to my right. It was a temporary sign which evidently was warning us drivers of some upcoming event. It was too small to contain the entire message so they broke it down into pages which displayed for about 3 seconds each. The first page I saw read:
July 12, 2009
From 6:00 AM
To 7:00 AM
Interested, I eagerly awaited the next page. About 3 seconds later the sign read:
Between
Exits 6 and 7
But, before I could find out what was happening during that block of time, I passed the sign. What in the world did that third page read? Should I plan on staying home? Should I leave home? What's happening?

Well, I started thinking about it and it occurred to me that it was pretty dumb to put that sign on the side of the road right after a curve. Why not put it after the curve in the ensuing half mile straight away?

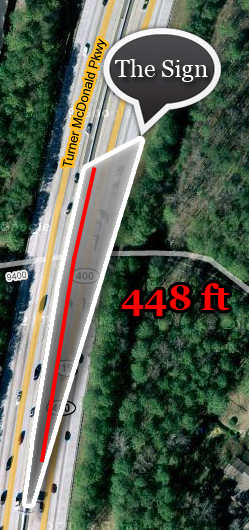
So, I looked into it. If you take a look at the image above, you'll see the approximate location of the sign. I drew a line segment starting at the sign, passing the west most occluder, and ending at the median between the northbound and southbound lanes.

Then, I traced the median all the way up to the approximate angle where I could no longer see the sign because the visual angle was too narrow.

Next, I traced the fast lane (the longest route within the "polygon of visibility"). I measured it out in google maps and it turns out that the sign was visible for 448 feet.

The speed limit at this point on GA 400 is 65 miles per hour (approx. 95 ft / s). That means that the sign was visible for just shy of 5 seconds.

I'm sure by now, you've done the math and come to the same conclusion. If the sign pages rotate at a minimum of 3 seconds per page and the maximum visible time at or above the speed limit is 5 seconds, then it is only possible to read 2 pages of data. However, the message must be at least 3 pages in order to be complete.

There's no way to reasonably expect drivers to read the entire message and therefore most people passing that sign today will have no idea what the full message is. Evidently, when it comes to sign placement, it takes an engineer.

It Takes an Engineer

EngineeringI'm pretty excited about this post. Not only is it my first blog post in a while (I've been pretty swamped lately and haven't had a chance to write anything), but it's also the first new section I've started in a long time.

This entry marks the first post in a series of posts I call, "It Takes an Engineer." It's about all of those things we see in daily life that would be better if they consulted an engineer first.

I'm sure, if you're reading this blog, you probably know what I'm talking about. It's the stuff that makes you stop and say, "what the hell were you thinking when you did this?" Or, "you really thought this would be intuitive?" Or, "if someone thought about how this was going to be used, I wouldn't have to fix it all the time."

Well, this is going to be my venue for venting on this topic so I hope it provides enjoyment to all. If you have anymore good examples, let me know and I'll blog about them too.