Wednesday, December 31, 2014

Our 2014 Charity Picks

Charitable Giving

We feel lucky every day. Our community has provided us with a great place to live and work. Our kids can grow and learn in safety and comfort. We're surrounded by opportunities personally and professionally.

For that, we are eternally grateful, and we like to give a little bit back to our community. We work hard to research the charities we choose to support and to make sure they're doing the greatest good with their contributions.

Here are the charities we selected for 2014

Episcopal Relief and Development

Episcopal Relief & Development works to save lives and transform communities worldwide. They rebuild after disasters and empower people to create lasting solutions that fight poverty, hunger, and disease. They working in 40 countries impacting the lives of nearly 3 million people around the world.

ERD has a high rating on Charity Navigator. While we typically seek a higher rating, it's very close to the highest it can be and we have close personal ties with the organization.

One thing we love about this program is you get to donate specific needs to the communities you're supporting. This is certainly the first time we've donated a cow and chickens. We also funded farming tools and community gardens, prenatal and postnatal maternity care, and 1 year of education for 5 girls.

Tiger Flight Foundation

A little closer to home, the Tiger Flight Foundation, base in Rome, Georgia inspires kids to be "Pilot in Command" of their own lives. All donations go toward the motivational and character development programs.

My relationship began with Tiger Flight as a volunteer pilot. I had a young man in my plane and as we taxied out, he said, "I've never been in a plane before." I asked him what was his favorite place to visit. He told me he'd never been out of Rome, GA. He was nervously excited as we started rolling down the runway.

We had barely left the ground when he could no longer contain his excitement and he looked at me almost teary-eyed and said, "I feel like I can see the whole world from here!" I thought, "from here kid, the whole world is in front of you . . . and I think you'll see it."

Friday, December 5, 2014

Secure Foscam IP Cameras with SSL on Raspberry PI and NGINX

Foscam + Raspberry Pi = SSL

When my first kid was born, my wife and I wanted a convenient, cheap, but externally accessible way to monitor our daughter. Thus, the usual baby monitors wouldn't do the trick. We ended up getting a really handy and super cheap Foscam FI8910W IP Camera.

Everything about it is pretty great … except security. For that reason, I never poked a hole through my firewall so that friends and family could peek in on Piper from time to time. I could always access the camera over VPN, but nobody else could ('cause I'm stingy with my network access).

When I found out I had another one on the way, I decided that not only did I need another camera, but I needed a more convenient way to securely access my cameras from outside my house. I decided I to pick up a Raspberry Pi and expose an https endpoint that could reverse proxy requests to my ip camera. This way, I have a secure connection into my house. It's still plain text between the camera and the pi, but that's inside my network and I'm less concerned about it there.

In any case, I picked up a Raspberry Pi Starter Kit which I recommend for your first pi. It'll come with the components you'll need to get set up. The second time I did this (for the sake of recording the steps to write this blog, I just formatted my own noobs card and I used the wifi dongle from the previous pi kit.

I tried to install noobs lite on an 8gb microsd card I got from the Raspberry Pi Downloads page, but noobs lite didn't work with the wifi dongle so I recommend plain old noobs. For the second time around, I just downloaded Raspbian and used dd to image the microsd. Again, I recommend noobs (and I recommend the starter kit) unless you feel pretty comfortable with command line utilities. If you are, use the instructions for installing operating system images from the raspberry pi site.

Pi

That being said, with noobs, you just format your micro SD card with FAT and copy the contents of the noobs zip to the sd card root. Put the SD card in the pi, connect the mouse and keyboard, connect ethernet or the wifi dongle, connect some video output, etc. Then, plug in the device.

The first thing to do is get connected to wifi. It's easier to do in the GUI so run startx, configure your wifi network, and log out.

Enable SSH in sudo raspi-config.

Using SSH to administer a box is kind of a pain without tmux so get that. Also, vim is awesome so get that too. Finally, we're going to be using nginx as our reverse proxy so install that as well.

sudo apt-get update && sudo apt-get install tmux vim nginx
To make SSH even easier, scp your public key to your pi's ~/.ssh folder and cat it into authorized_keys.

If you are using wifi, you'll find that wifi is disable after rebooting until the dongle is removed and re-inserted. You can change this behavior by executing

sudo vim /etc/network/interfaces
and changing
iface wlan0 inet manual
wpa-roam /etc/wpa_supplicant/wpa_supplicant.conf
to
auto wlan0
iface wlan0 inet dhcp
wpa-conf /etc/wpa_supplicant/wpa_supplicant.conf

You'll want nginx to start automatically on reboot too probably so execute

sudo update-rc.d nginx defaults

Router

Give your pi a static ip address. My router lets me map static ips to mac addresses. DD-WRT lets you do that too. If you can't with your router, configure a static ip address following the Debian Network Configuration Instructions.

Give your router a static ip as well.

Forward port 443 (the default SSL port) to 443 on the pi's IP address

Get a dynamic DNS account that's supported by your router. If your router doesn't do dynamic DNS (and you can't install a decent firmware that does, you can use ddclient on your pi instead.

Domain

You'll need a domain name that you own to get an SSL certificate. Register one.

In your domain's DNS configuration, create a subdomain with a CNAME record pointing to your dynamic DNS domain.

SSL

Get your SSL certificate from Start SSL (the free certificate will be fine). You'll have to validate your domain. The process is pretty straightforward.

Download your certificate, key, and the intermediate certificates and make a unified certificate:

wget http://www.startssl.com/certs/ca.pem
wget http://www.startssl.com/certs/sub.class1.server.ca.pem
cat ssl.crt sub.class1.server.ca.pem ca.pem > ssl-unified.crt

SCP the key and the unified certificate to the pi's /etc/nginx folder (I like putting my certs in a subfolder)

Configure nginx

Create a configuration file called /etc/nginx/sites-available/ipcams

server {
  listen 80;

  server_name your.domain.com;
  server_name your.pi.ip.address;

  return 301 https://$host$request_uri;
}

server {
  listen 443 ssl;

  ssl_certificate /etc/nginx/certs/ssl-unified.crt;
  ssl_certificate_key /etc/nginx/certs/ssl.key;

  server_name your.domain.com;
  server_name your.pi.ip.address;

  location /front_porch/ {
    proxy_pass http://your.porch_cam.ip.address:80/;
  }

  location /baby_room/ {
    proxy_pass http://your.baby_cam.ip.address:80/;
  }
}

Remove the default symlink from /etc/nginx/sites-enabled and add new symlink

cd /etc/nginx/sites-enabled
sudo ln -s ../sites-available/ipcams ./ipcams

Restart nginx:

sudo service nginx restart

Summary

So, now https requests to your subdomain are resolved by your dynamic DNS to point to your IP where your Pi is. Your Pi gets an https request and forwards it inside your well protected network (in plain text) to your camera. I keep my Pi wired to cut back on the wireless traffic that happens in plain text. In any case, this way you can get from outside your house to inside your house over an encrypted ssl connection.

Friday, November 14, 2014

Refresh/Update jQuery Selector after Ajax or other DOM Manipulation

jQuery Logo

I'm working on a more or less single page app right now. As such, there's a lot of dynamic DOM manipulation. Sometimes, we need to re-evaluate a jQuery selector to get the new set of objects after the DOM has changed.

Typically we've solved this problem by always using the selector to find the children. This became really frustrating in my Jasmine tests where I found myself doing this a lot!

    it("toggles the display of an element", function() {
        var $togglableItem = $('.togglable');
        expect($togglableItem.length).toBe(0);
        
        $button.trigger('click');  
        var $togglableItem = $('.togglable');
        expect($togglableItem.length).not.toBe(0);
        
        $button.trigger('click');  
        var $togglableItem = $('.togglable');
        expect($togglableItem.length).toBe(0);
    });

Even in production code (outside of tests) that can be kind of a pain. I wanted to be able to do something more like this:

    it("toggles the display of an element", function() {
        var $togglableItem = $('.togglable');
        expect($togglableItem.length).toBe(0);
        
        $button.trigger('click');  
        expect($togglableItem.refresh().length).not.toBe(0);
        
        $button.trigger('click');  
        expect($togglableItem.refresh().length).toBe(0);
    });

A Common Solution

I've seen some implementations of a jQuery refresh plugin that look like this:

(function($) {
    $.fn.extend({
        refresh: function() { return $(this.selector); }
    });
})(jQuery);

I have two problems with this approach. First, I don't always have my elements attached to the DOM when I want to do a refresh. In fact, typically in testing, I don't add my test elements to the DOM so I can't just reuse the selector. The selection depends on the parent jQuery object.

Second, I also really enjoy the fluency of jQuery and often make use of .end() method when it makes sense. The approach above flattens the selector stack and .end() returns the default jQuery object.

Preferred Approach

To maintain the fluency of jQuery and allow the refresh, here's what I'm proposing:

(function($) {
    $.fn.extend({
        refresh: function() { 
            var $parent = this.end();
            var selector = this.selector.substring($parent.selector.length).trim();
            return $parent.find(selector); 
        }
    });
})(jQuery);

Caveats

I haven't used this in the wild yet. I know .selector is deprecated, but it's the best I could find for now. It does, however, work pretty darned well in my Jasmine tests. :)

Monday, May 12, 2014

How to Market a Mobile App: Professional Design

The New This to That

The next phase in the How to Market a Mobile App series was to try a whole new look and feel. While I feel like the design of This to That was actually pretty good, it's obvious design is not really my strong suit. I hired a professional design company that reworked my icon for about $150.

I dropped the new icon into the game and had my wife play with the This to That theme generator for a while. She came up with what is now the current This to That default theme. We are pretty pleased with the way it turned out and it appears users are too.

Promotional Images

Another thing we changed were the promotional images that show up with the app on the app store. I had reviewed dozens of my favorite apps to see which ones I thought had the most compelling promo images. I noticed I was most enticed by promotional images that featured interesting design with the application screenshot embedded in the image (rather than the whole image itself).

I had tried my hand at this kind of design and these are what I had before:

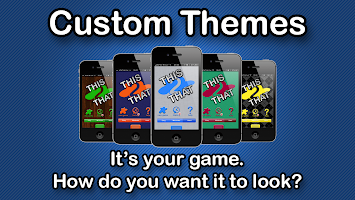
Game Center Integration Intuitive Play Social Features Custom Themes

In an effort to try something new (and to get a new release out faster), I decided to replace these with simple screenshots. You can see them on the This to That on iTunes page. I may have my designers throw together some new promotional images if I start to get enough data about new downloads that I'll be able to share any significant observations about their effectiveness.

Results

Before/After Pro Design

The new graphics don't appear to have had a huge impact on new users. It looks like about 10% - 20% more downloads than before. None of the current users have complained in comments or ratings so that's probably a good sign really. I think the most interesting statistic I've observed this time around is in session duration.

It appears whatever I added between 3.5 and 4.1 was displeasing to users. We went from an average of 4 minutes per session to about 2 minutes per session. 4.2 brought us back up and 5.0 and 5.1 have leveled us off at about 3 minutes per session, but almost all of our players now play every day.

A few other observations

  • Very few people attempt to play multiplayer
  • Many players open the drawer; very few swipe it
  • Since we moved the help button, more people click help
  • There are very few social sharing events
  • Most common incorrect words: TOOS, BEAS, SEAP, BONS, BAIN

Next Steps

I have a release ready to go in hopes that we get more reviews on the app store (hopefully positive too). We have always had a feedback button in the app, but at some point the link broke so presently it takes you to the app store but not to the app's page. To fix this, we started using appirater. On a related note, I recommend using cocoapods for iOS app dependencies.

Saturday, April 19, 2014

How to Market a Mobile App: Professional Review Sites

Mobi Apps Review

I've been working on the revealing (and humbling) How to Market a Mobile App series so I've found myself more open to some ideas that I usually am. A few months ago, I got an email from the owner of Mobi Apps Review. I've heard about sites like this before that establish a viewership on their website and on social networks. Some friends tried it out paying as much as $5,000 for one review.

Mobi purported to have 25,000 followers on twitter and the same on facebook. The offer was to write a review and publish it on all of their social networks for $25. I figured, it's worth 25 bucks just to know what a little exposure could do for me. Besides, it'll give me something to post about on the Mobile Magic Developers facebook page.

The Mobi Apps Review of This to That came out March 6th, 2014. It was nice to see that the review was generally positive. Not all of the reviews on Mobi are positive so I feel like the reviewer really did enjoy the game.

Results

I reviewed the Google Analytics for the 3 weeks before and the 3 weeks after the Mobi review was posted. I saw no discernible effect on new users.

Conclusion

I don't think the lack of results necessarily indicates that the review had no impact. To be sure, I could've spent more effort promoting the review. I also, unfortunately, have no insight into how many viewers actually saw the review. Of those viewers, I have no idea how many visited the This to That for iOS app store page. Even if I did, I have no way of knowing how many people who view the app store page actually download the application and whether or not the review had an impact on that.

All in all, I think it was worth 25 dollars, and I expect to get value out of it at some point. Now, I can mention the 5 star review in the profile description which needs to be revamped anyhow. I can also reference it in posts on our facebook page. The gestalt effect of having an additional third-party link out there is likely to help support my efforts in marketing This to That.

How to Market a Mobile App: Design Counts

Default theme progression

As I discussed previously in the How to Market a Mobile App series, one of the first things I could do to improve user experience in This to That for iOS is not only to support the look and feel of iOS 7 but also to improve the color selections of the default theme. At the time I released the latest version of This to That, the iOS 6 SSL vulnerability hadn't been discovered yet, so I have a new default iOS 6.0 theme (that nobody will ever see again). :)

Results

There were no notable changes in new user acquisitions nor in returning user frequency. There may have been a slight reduction in session time and a slight increase in screen views per session. Reviews are still generally positive, but it appears changing the theme had very little impact on the performance of the application

Next Steps

I had a new icon designed professionally. I made the current icon and while I think it's pretty cool, it definitely doesn't look quite as engaging as the new one does. I need to re-release This to That with that icon in hopes that it increases new user acquisition.

Screenshots

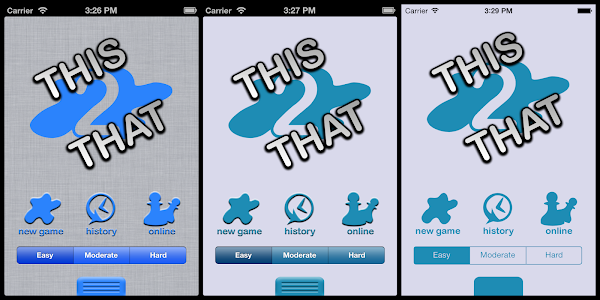
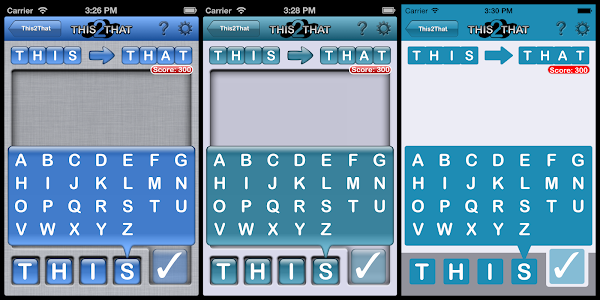
Each set of screenshots shows the original theme on the left, the new default iOS 6 theme in the middle, and the new flat iOS 7 theme on the right. You can still select the "reflective" tile type in the theme builder to get the old look and feel, but the linen background is no longer available to iOS 7 users. Instead, it's just gray.

Basically, the theme is lighter, flatter, and sharper. The last few images demonstrate the difference in texts. Instead of inlaid icons for the letters, they're all just flat letters in a built in system font. Eventually, I think I'd like to switch the fonts throughout the application to use iOS 7's default font.

Default theme progression

Letter selector theme progression

Complete game theme progression

History theme progression

Game font changes

Letter selector font changes

Saturday, March 15, 2014

A Limerick Standup: AngularJS, PhantomJS, and Jasmine

Logs

In honor of St. Patty's Day, I decided a limerick standup would be appropriate:

I've made some good progress with Angular
Though nothing of mention particular
     I have some good tests
     That pass in PhantomJS
And if Jasmine were here, I would strangle 'er

Friday, February 7, 2014

Sending Java Stack Traces to Loggly

Logs

Recently at my new Autopilot contract, I was tasked with configuring some of our applications to send log entries to Loggly. We're using log4j, rsyslog, and syslog4j.

The Loggly service produces nice data which are easily accessible through a pleasant interface. The configuration was simple, logging works from anything that can log with syslog, and Loggly support was generally responsive (it definitely helps to have a corporate relationship).

Once we had the environment configured, we configured log4j following Loggly's Log4j Setup instructions. We were getting log messages into loggly in no time. The only problem was that we weren't getting stack traces.

This was a little bit confusing because the setup document reads:

You can send your Java logs using Log4j. The method shown supports multi-line events such as a Java stacktraces over Syslog.

I dug through the my usual channels looking for someone else who had the same experience. All I was able to find really was this one Stack Overflow question.

Not really being a Java guy, I assumed I was just missing something. In fact, the folks at Loggly told me I was missing something too. :) I first started looking into the rsyslog documentation regarding multi-line log entries (like stack traces). I noticed that the file input module supports a ReadMode attribute, but the udp input module does not.

I added a rolling file appender to my log4j.properties file, I configured the imfile in our rsyslog config file, and we were off to the races. Good looking easy to read stack traces. It's worth noting I'm using the paragraph ReadMode because not all lines in a Java stack trace are indented. Thus, I needed a full blank line between log entries. This is more or less our log4j.properties configuration for the rolling file appender:

  log4j.appender.ROLLING=org.apache.log4j.rolling.RollingFileAppender
  log4j.appender.ROLLING.File=/tmp/log4j.log
  log4j.appender.ROLLING.rollingPolicy=org.apache.log4j.rolling.TimeBasedRollingPolicy
  log4j.appender.ROLLING.rollingPolicy.FileNamePattern=/tmp/log4j.log.%d{yyyy-MM}.gz
  log4j.appender.ROLLING.layout=org.apache.log4j.PatternLayout
  log4j.appender.ROLLING.layout.ConversionPattern=%n%d{yyMMdd.HHmmss,SSS} %t %C{1}.%M %p: %m%n

This was well and good but I wanted to make sure I wasn't missing a simpler alternative. The docs said it would work via rsyslog udp and I wanted to know why I was having such trouble. I looked at the network traffic coming from my dev instances. I noticed that my messages didn't include any stack trace information at all. It wasn't just a multiline issue really. It was that stack traces were never being logged by syslog4j. I looked into the ConsoleAppender and found that it gets its append behavior from WriterAppender.subAppend. That method is how the console gets stack traces after the message has been written using the layout.

if(layout.ignoresThrowable()) {
    String[] s = event.getThrowableStrRep();
    if (s != null) {
        int len = s.length;
        for(int i = 0; i < len; i++) {
            this.qw.write(s[i]);
            this.qw.write(Layout.LINE_SEP);
        }
    }
}

I started looking at the Syslog4jAppenderSkeleton.append method. I noticed that this appender never logs stack traces at all.

protected void append(LoggingEvent event) {
 if (!this.initialized) {
  _initialize();
 }
  
 if (this.initialized) {
  int level = event.getLevel().getSyslogEquivalent();
   
  if (this.layout != null) {
   String message = this.layout.format(event);
   
   this.syslog.log(level,message);
   
  } else {
   String message = event.getRenderedMessage();
   
   this.syslog.log(level,message);
  }
 }
}

It was no wonder I wasn't getting stack traces into loggly. I looked back at the ConsoleAppender and wondered what the layout.ignoresThrowable was. I looked at the docs and found that the PatternLayout.ignoresThrowable method always returns true because it can't handle throwables. In fact, the same page reads:

A flexible layout configurable with pattern string. This code is known to have synchronization and other issues which are not present in org.apache.log4j.EnhancedPatternLayout. EnhancedPatternLayout should be used in preference to PatternLayout. EnhancedPatternLayout is distributed in the log4j extras companion.

Easily convinced, I switched to the EnhancedPatternLayout. I configured the ConsoleAppender to use the enhanced pattern layout and I added the %throwable configuration item to it. Viola! Stack traces . . . by my own doing. I copied the configuration to the Syslog4jAppender section, started the long deployment process, and watched in disappointment as I still had no stack traces.

I started messing with the layout on my Syslog4j appender and noticed nothing I did changed the resulting log message. That seemed a little odd, so I dug into that a little. I dug back into the Syslog4jAppenderSkeleton.append again. I set a breakpoint on this.layout.format(event); and attached the debugger. My breakpoint was never hit. The layout was always null!

I set out in search of where that field was getting set. We're using the log4j.properties file so our configuration is parsed by the PropertyConfigurator parseAppender method. This is a pretty big method but here's what I noticed:

if(appender.requiresLayout()) {
    Layout layout = (Layout) OptionConverter.instantiateByKey(props, layoutPrefix, Layout.class, null);
    if(layout != null) {
        appender.setLayout(layout);
        LogLog.debug("Parsing layout options for \"" + appenderName +"\".");
        //configureOptionHandler(layout, layoutPrefix + ".", props);
        PropertySetter.setProperties(layout, props, layoutPrefix + ".");
        LogLog.debug("End of parsing for \"" + appenderName +"\".");
    }
}

So again I looked at the implementation of Syslog4JAppenderSkeleton and found that requiresLayout always returns false!

public boolean requiresLayout() {
    return false;
}

This struck me as odd and it made me wonder how anyone ever was able to use the layout property with syslog4j. It turns out that DOMConfigurator.parseAppender ignores requiresLayout and sets the layout any time there's a layout tag in the log4j.xml configuration file.

// Set appender layout
else if (currentElement.getTagName().equals(LAYOUT_TAG)) {
    appender.setLayout(parseLayout(currentElement));
}

Having a fundamental opposition to switching to XML, I needed another way to get the Syslog4jAppender to respect my layout desires. To my chagrin, the best approach I could come up with was to subclass the Syslog4jAppender and override the requiresLayout method:

public class Syslog4jLayoutAppender extends Syslog4jAppender {
   @Override
   public boolean requiresLayout() {
      return true;
   }
}

I switched my configuration to use this appender, redeployed, and my stack traces started to appear in loggly. Unfortunately, they were all on one line with character codes in place of linefeeds. Preferring easy to read stack traces, I flipped the rolling file appender back on and considered this the best alternative. In short, here's how I get stack traces into loggly:

  1. Configure a RollingFileAppender
  2. Configure rsyslog to use the imfile module to monitor the file with paragraph read mode
  3. Profit

Saturday, January 25, 2014

How to Market a Mobile App: Knowledge is Power

Data!!

If you're going to understand how changes you make to your application affect your users or how effective your marketing strategy is, you're going to need data. All of the app markets provide decent data about downloads, active users, ad impressions, etc., but these are no match for deliberate data collection and usage statistics.

In the early days of This to That for iOS, we didn't include any analytics. We relied heavily on iTunesConnect to provide the statistics we needed to determine the effects of our changes. Google Play provides much better analytics out of the box including active installs, device statistics, OS versions, etc., so we had to make a lot more inferences.

For example, we could see daily downloads but we had no idea how many users we were retaining. At that point, we were releasing often so we could compare our download statistics to our upgrade statistics to get a feel for that. We further refined our estimates when we added Game Center support. Comparing the new user statistics to the Game Center names I didn't recognize (seriously), I estimated about half of the users use Game Center. Thus, we could infer that for every player who reported a score to the leaderboard, there was a roughly equivalent user without a Game Center account.

We also planned to be ad supported out of the gate, so we were able to get some usage information from ad impressions. Our app has a roughly 98% fill rate and filled ads cycle about every 3 minutes. Combining that information with estimated users per day, we could guess how much time people spent playing our game.

Several versions back, we started using Google Analytics to collect anonymous (we're not the NSA after all) usage statistics. Now we get a much more detailed view of our users and how they play This to That. I recommend developers consider analytics to be an inextricable part of any minimum viable product. Without analytics, there's no way I could write the How to Market a Mobile App series as I'd have no way of knowing how these experiments impact our application's performance in the app market.

Starting Point as of Version 4.2

  • 910 sessions lasting an average 3.5 minutes per month
  • 108 of these sessions are new users (about half are iOS 7)
  • About 80% of the sessions end on the first screen and last less than 10 seconds
  • About half of the users play at least 10 times per month
  • About 90% of users play This to That at least every other day

I think these statistics tell us a few meaningful things about This to That. The first and I think most obvious inference, which is the reason I'm writing this series (and is likely the reason you're reading it): people can't find and don't hear about This to That. To resolve this, we've added social features, game center, multiplayer gameplay, and have tried advertising. As of yet, to no avail.

Second, I think, is that many users never get past the first screen. I think that's likely because the look and feel of the default game theme may not be appealing (I'm not a designer after all). iOS 7 users are less likely to engage than iOS 6 users; it might be worth updating the default look and feel of the application for iOS 7 users.

I think there are some positive observations in these data too. Users who play the game tend to play it often (at least for a while). They tend to play several times a day for short periods. This gives me insight that the game should be quick to get into. Perhaps, for example, the game should start in the game screen and have a menu option for going to what's now the home screen.

Things to do in Version 5.0

  • Create an iOS 7 default theme
  • Clean up the default color scheme for all new users
  • Make a better app description for iTunes
  • Make more compelling graphics for the images in iTunes
  • Clean up the icon

I'm hoping we'll see a larger number of new users by having more compelling marketing in our This to That iTunes profile. I'm also hoping that the improved icon and cleaner default theme will make new users more likely to complete their first game (most users who complete the first game complete many subsequent games). I'm hoping having more users and retaining a higher percentage of them will also result in a higher likelihood that users will share the game with friends.

There was a slight drop in retention after we released the multiplayer version of This to That. I think that users were frustrated when they tried to connect to a multiplayer game, but nobody else was playing. That frustration overpowered the interest in playing the original single player version. When we released that version, we were hoping it would encourage users to invite friends and family to play. Ideally, the new design and higher retention rate would also result in more available online users for random game center match creation.

What's it Going to Take?

Well, one thing I like to do as an independent developer is work on the cheap. I think that I've managed, on my own, to make a fun and entertaining application; however, I admit it lacks a certain je ne sais quoi. Perhaps it lacks the polish of the kinds of games people make when they have designers on staff. Perhaps it feels unprofessional. Of all of the negative feedback I've ever gotten, I don't think anyone has said, "the game isn't fun." So, I'm going to have some artwork done professionally. The game, in its current state (with the extensive theming) would be difficult to overhaul, so I'm going to focus on 3 components: the icon, the screenshots in iTunes, and the default theme. I'm hoping to get all of this done for about $500 - $750. I have a few quotes in and I think this is a reasonable expectation.

Friday, January 24, 2014

How to Market a Mobile App: Where to Start

confused emoticon O.o

Mobile Magic Developers has several applications on various mobile marketplaces now. My 2 year old daughter loves Cow Says Moo. My mother in law has been playing This to That for years. Our friends get goodnatured laughs with Said Obama. All in all, developing mobile applications has been a really positive experience.

In graduate school marketing classes, we spent a lot of energy discussing myriad ways large organization with massive marketing budgets could broaden their customer bases. I'm sure that information is still somehow useful but it surely doesn't help independent developers like Mobile Magic Developers who don't have a marketing budget, let alone enough to hire an MBA marketing consultant. In fact, our marketing campaigns like the rest of our expenses, are still being paid out of our pockets.

So, where do you start on the quest to release a popular mobile application?

I Have No Clue O.o

I sincerely have no idea. I've read a lot of good blog posts about marketing mobile applications. I've purchase some really interesting books on the topic. My brother has a BA in marketing. I did get some marketing exposure in college. Despite all of this, I still have some really great apps nobody uses.

That's why I'm starting the How to Market a Mobile App series (well, that and I haven't blogged in almost 2 years and it's high time I get back to it). I'm going to start by introducing, with complete candor, where we are with This to That for iOS today and how we spent the last few years getting to what is effectively a good starting point.

I have a new plan for spreading the word about This to That with a limited budget over the next few months. I'll blog about every strategy I try and how each idea fails and succeeds (including all of the nitty-gritty and sometimes embarrassing details). Every time I add a new post, I'll include it in the index below so bookmark this page for a convenient starting point.

Worst Case Scenario? :*(

Well, as I've shared, I don't really know much about successfully marketing a mobile application, but I have learned a handful of things not to do. That tells me that the worst case scenario of writing this series both for me the writer and you the reader (and subscriber hopefully) is that together we learn a few more things not to do. But, who knows? Perhaps we'll figure out the right formula for getting our wonderful apps into the hands of the target audience who can get the most value out of them.

How to Successfully Market a Mobile Application